Wn99 Brévands le Châlet

Details
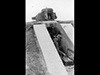
Situated near the mouth of the Canal de Carentan on the east bank just north of the village of Brévands in the Polder land. A small Wn but spread over quite an area with barns used as barracks, several bunkers and Tobruks.

.
Wn99 Brévands le Châlet
Details
Wn99 Brévands le Châlet


Tactical Targets 4902/14 April 1944
Details
Pos: IV./726 : Ost Battalion 439 (Ukrainians) (352. Infanterie-Division). (Hauptmann Hans Becker - CP: Les Veys)
2 x Vf2a bunkers.
1 x Vf1a bunker.
1 x Tobruk Pz.T.(f).
1 x Vf58c Tobruk.
1 x Vf/MG stand.
In 1944, the sector of Brévands is held by the Ukrainian soldiers of the Ost-Battalion 439 (352. Infanterie-Division). This hamlet of Brévands is located on a high point on the eastern bank of the Douve which is crossed to the west of the place called Le Port by two bridges built by the Germans during the Occupation. These bridges represent the southern boundary of the bridgehead, and on D-Day pass under the control of the paratroopers of the 3rd Battalion of the 506th Parachute Infantry Regiment (101st Airborne Division) led by Lieutenant-Colonel Robert L. Wolverton. Indeed, these bridges represent the only crossing points of the Douve (with the lock of the Barquette) between the sea and Carentan and the Americans want to prevent the Germans to counter-attack their bridgehead to the south. In case of a particular threat, parachutists must destroy the bridges with explosives.
The 327th Glider Infantry landed by sea on Utah Beach due to the fact there were not enough gliders for them to use, so they advanced inland and were ordered to cross the river. It seems it was a rather badly planned operation, they were mortared by their own guns. That sorted, they advanced on Carentan and started to take the north side of the town as the 101st Airborne took the west side. After Carentan the Glider Infantry continued east to meet up with the US 175th Reg. that had landed on Omaha Beach and they both then moved south to take on elements of Kamfgruppe (fighting group) of the 275th Inf. Div.
Wn99 with Wn98 & Wn97 all made up StP Brévands, looking at the infrastructure of Wn99, this seems to be the HQ for the three major Wn's. Wn97 has 2 x Ringstands for le.Gr.W.203(f) mortars. Wn98a-b-c have a Vf2a and an SK type shelter.
.jpg)
Ost Troops..
Wn99 Brévands le Châlet

Google
Details
The two barns are just south of this plan, then the road continues towards a large earth bank or dyke running from LtoR and the road drives over it.
A : Barracks area with a barn and the remains of a building + Tobruk. Pos. firing point for a field gun or mortar.
B : Ammunition niche.
C : Vf2a bunker + Tobruk.
D : Vf1a bunker + Pz. T.

Tobruk.

Plan of A.
Wn99 Brévands le Châlet

11 May 2008
Details
Le Port
The view up the the Canal de Carentan towards Wn99 and the sea.
A lot of fighting went on after the 6th/7th June here. First the 101st Airborne tried to cross this canal and then later the Glider infantry did succeed and continued its advances on Carentan and meeting the 101st in the town.

Plan..
Wn99 Brévands le Châlet

11 May 2008
Details
First of the two barns.

Plan.
Wn99 Brévands le Châlet


11 May 2008
Details
The second barn.
I think these barns were used as barracks for troops stationed at Wn99. Set into the wall (red square) are ladder rungs for access to the upper floor.
One of the ladder wrungs sticking out of the wall.
Wn99 Brévands le Châlet


11 May 2008 --------------------------------------------- Bing
Details
The road rises over the earth bank and set into the south side is a Vf2a Group bunker. Behind, another barn with a ladder to its first floor and behind that, remains of a concrete building and a ringstand of a possible mortar base.

Plan.
Site plan.
/278_fcrew100.jpg)
8.1cm mortar & crew.
Wn99 Brévands le Châlet

11 May 2008
Details
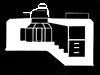
Vf2a group shelter.
This group shelter may have been the command / local HQ bunker with telephone contact to all the other bunkers in Wn99 and the main HQ probably back in Brévands. Also these Vf2a's all seem to have ammunition niches next to them, this can just be seen to the left of the entrance.

Vf2a group shelter.
Wn99 Brévands le Châlet

11 May 2008
Details
Vf 2a entrance.
A 19P7 gas tight door.

A 19P7 gas tight door.
Wn99 Brévands le Châlet


11 May 2008
Details
Vf2a group shelter.
Bolted to the walls are these (galvanized in this bunker) iron brackets to hold three bunks, this bunker had enough bunks for nine men, although they could hold up to 15 men.
A close up of a bunk hook with two large metal brackets and an air vent pipe.
Vf2a group shelter.

Hooks for the beds..
Wn99 Brévands le Châlet

11 May 2008
Details
Vf2a group shelter.
There would have been a 410P9 steel escape door fitted here.
To escape, you had to open the 410P9 door, crawl in and breakdown the brick wall (usually no that strong and easy to smash through). Then clear away sand or gravel placed down the escape. The idea of that is, an enemy trying to attack a bunker through an escape, has to dig out the sand/gravel and then break down the wall and open the 410P9 door. Pretty impossible. So when the occupants of the bunker have opened the door, removed the bricks, removed the sand/gravel. They could then squeeze their way through, climb the steel ladder wrungs to the outside. And good luck with that boys.

410P9 escape door.

Escape.

Others had shutters to block off the exit, but here they all used bricks..
Wn99 Brévands le Châlet


11 May 2008
Details
Vf2a group shelter.
Fittings for a Wast 18 model standard bunker telephone system by Siemens of Germany.
Command cables coming into the bunker.

Phone & junction box.

Wast 18 model standard bunker telephone system.

You can see the fittings correspond with the marks on the wall..
Wn99 Brévands le Châlet

11 May 2008
Details
Vf2a group shelter.
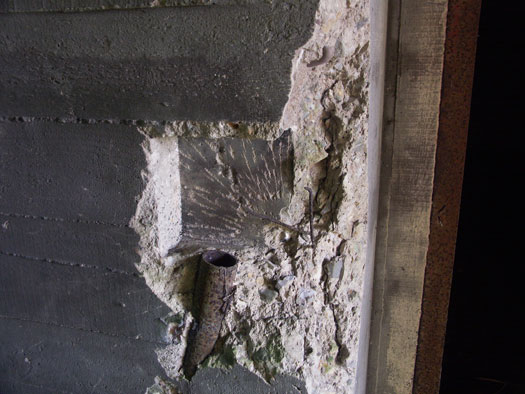
This looks like a bullet splash marks.
Either bullet marks or grenade marks.
Wn99 Brévands le Châlet


11 May 2008
Details
Barn No.3 showing the ladder rungs going up to the window and brackets that I have no idea what they were for.
This picture I climbed the ladder.
Wn99 Brévands le Châlet

11 May 2008
Details
These two ports/embrasures could have been rifle ports covering the north.
Wn99 Brévands le Châlet

11 May 2008
Details
The red square shows the rifle ports.
There is a round concrete object to the right of the two feed trough?
We have had a sad moment trying to work out what it was - AA gun site, A/T gun pit, water reservoir, etc, etc.??? mortar emplacement?
Wn99 Brévands le Châlet


11 May 2008
Details
Set to the right of the Vf2a is what looks like a gun garage. It is not too wide and if it is, it could only have been a small 2cm type anti-tank gun?
As can be seen it is very narrow and there is a square escape hole in the roof.

2cm AT gun.

2cm AT gun.

3.7cm AT gun.
Wn99 Brévands le Châlet

11 May 2008
Details
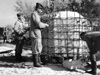
The roof of the garage wit hooks to attach a camouflage net too.

Laying out camouflage.
Wn99 Brévands le Châlet


11 May 2008
Details
Concrete hut.

Field kitchen.
Wn99 Brévands le Châlet


11 May 2008
Details
Details of a fire in the corner with a chimney flu.

WT 80k.
Wn99 Brévands le Châlet

11 May 2008
Details
Wn99 Brévands le Châlet

11 May 2008
Details
The view along the dyke looking east and the ammunition niche with a blast wall, all these were local construction. Possibly one of the soldiers was a fortress builder in the past and had some good ideas?
Above : plan
White : Wn99's bunkers/ buildings.
Red : barn.
Yellow : circular concrete thing?
Wn99 Brévands le Châlet


11 May 2008
Details
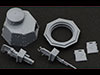
Ammunition niche with a blast wall.

Screw picket used to strengthens the concrete and also a camouflage net can be attached to the hook.
Wn99 Brévands le Châlet


11 May 2008
Details
Vf58c Tobruk. This was for defence and also a lookout post and covered the rear of the defence.
Building one.
Vf58c Tobruk.
Observation.
Wn99 Brévands le Châlet

11 May 2008
Details
The next three positions, we go right, then left and last middle.

C, B & D on the canal.
A HQ area.
Wn99 Brévands le Châlet

11 May 2008
Details
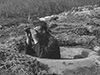
Walking along the dyke bank out to the canal side possible weapons pits.

Circled in the main photo is what looks like a bunker, but we felt it was built by duck hunters or fisherman as a shelter?

Weapons pit open emplacement facing north.
Wn99 Brévands le Châlet

11 May 2008
Details
Another ammunition niche with a covering wall like the one by the HQ area. Note the door fittings, two iron rings set into the wall for a bar to go through to hold a door closed.

The rear of the niche..

Ammunition boxes.
Wn99 Brévands le Châlet

11 May 2008
Details
Plan.
The next section, a water reservoir, a Vf2a group shelter, a Tobruk (we did not find but can be seen from aerial photos) and a small ammunition niche.

Water bottle..
Wn99 Brévands le Châlet

11 May 2008
Details
Vf2a group shelter.

Plan.
Wn99 Brévands le Châlet

11 May 2008
Details
I believe this is the Wasser tank.
Wn99 Brévands le Châlet

11 May 2008
Details
Vf2a group shelter.
Plan.
Wn99 Brévands le Châlet

11 May 2008
Details
Vf2a group shelter passage protecting the entrance.
Plan.
Wn99 Brévands le Châlet

11 May 2008
Details
Vf2a group shelter 19P7 door. This steel door with a gas tight seal and a small glass window.
19P7 door.
Wn99 Brévands le Châlet

11 May 2008
Details
Vf2a group shelter with a bunk bed fitting in place.
Wn99 Brévands le Châlet

11 May 2008
Details
Vf2a group shelter. Fittings on the wall for a Wast 18 phone.
Phone & junction box.
Wast 18 model standard bunker telephone system.
You can see the fittings correspond with the marks on the wall..
Wn99 Brévands le Châlet

11 May 2008
Details
Vf2a group shelter escape.
I explained the escape system earlier, all three of these bunkers have escapes with a brick wall.
Escape.
Wn99 Brévands le Châlet

11 May 2008
Details
Vf2a group shelter escape. The half round part is the exit from the escape, it could be half round or square.

The two types of escapes.
Wn99 Brévands le Châlet
Google
Details
We missed the Tobruk & the munitions store, but I did get electrocuted by the electric fence. Perhaps the shock too some wearing off.

Vf58c Tobruk.
Plan.
Wn99 Brévands le Châlet

11 May 2008
Details
Now we head further up the river, there may have been one of the two foot bridges across here.

Plan.
Wn99 Brévands le Châlet

11 May 2008
Details
The U shaped ringstand for an Ft-17 turret could cover 365° and with its French machine gun was quite a formidable defence., another munitions niche and a Vf1a group shelter.
Wn99 Brévands le Châlet

11 May 2008
Details
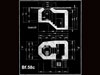
U shaped ringstand for an Ft-17 turret


U type Tobruk plan.
Rear access to the turret.

Wn18's Pz. T..
Wn99 Brévands le Châlet


11 May 2008
Details
U shaped ringstand for an Ft-17 turret
An 8mm Hotchkiss Mle 1914 [s.M.G. 257 (f)] .
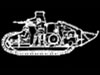
Renault F17 tank, the turrets were taken from.
.jpg)
FT17 Pz(f) machine gun used in this turret.
The parts of an FT turret, a machine gun or a 3.7cm could be fitted.
Wn99 Brévands le Châlet

11 May 2008
Details
Vf1a group shelter.
Wn99 Brévands le Châlet

11 May 2008
Details
Vf1a group shelter.
Entrance.
Wn99 Brévands le Châlet


11 May 2008
Details
Vf1a group shelter.
The passageway entrance.
Speaking tube to talk to the inside of the bunker.

Sprachrohr mouth piece.
Wn99 Brévands le Châlet

11 May 2008
Details
Vf1a group shelter.
19P7 type door.
19P7 type door.
Wn99 Brévands le Châlet


11 May 2008
Details
Vf1a group shelter.
Wn99 Brévands le Châlet

11 May 2008
Details
Vf1a group shelter escape.
Wn99 Brévands le Châlet

11 May 2008
Details
Ammunition niche.
Wn99 Brévands le Châlet

11 May 2008
Details
The road north.
Wn99 Brévands le Châlet

11 May 2008
Details
The last barn with steps up the outside wall.
Wn99 Brévands le Châlet


11 May 2008
Details
Inside the barn.
The view in from the top of the ladder.
Wn99 Brévands le Châlet


11 May 2008
Details
Saint-Marie-du-Mont across the marshes.
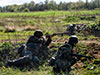
The 327th Glider Infantry landed on Utah Beach due to the fact there were not enough gliders for them to use, so they advanced inland and were ordered to cross the river. It seems it was a rather badly planned operation, they were mortared by their own guns. That sorted, they advanced on Carentan and started to take the north side of the ton as the 101st Airborne took the west side. After Carentan the Glider Infantry continued east to meet up with the US 175th Reg. that had landed on Omaha Beach and they both then moved south to take on elements of Kamfgruppe (fighting group) of the 275th Inf. Div.
In the process of crossing he river and then turning south, I would have thought a platoon or company would have also moved north to clear German forces in the Polder region of Brévands. As there can be seen quite lot of bullet splashes and grenade marks on the buildings and bunkers.

Saint-Marie-du-Mont.

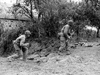
Glider Inf. advancing through an orchard.
Wn99 Brévands le Châlet


May 1944
Details
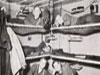
Map of all the defences drawn up by Allied intelligence, the map was a Bigot map. Bigot was the code name for, if you were Bigoted, you were in the know about D-Day,. If you were not Bigoted, you knew absolutely nothing of the plans. One of the best kept secrets.
Green - the Locks on the Vey (Éclouse due Port de Carentan).
Yellow - one of the two bridges built by the Germans to allow infantry free crossing of the river.
Red - the area of Wn99 showing another 'Light Bridge' and an anti tank gun.
Small anti-tank gun.

Pz. T..
Wn99 Brévands le Châlet

11 May 2008
Details
 Norway (coming soon!)
 France
 Great Britain