- Home
- Updates
- Contact
- Links
- Books
- Information
- Warrant Officer 1, MSM, T.W.H.B. Drew, Royal Army Service Corps, Dunkirk 1940. My Dad.
-
 Norway (coming soon!)
 France
- AOK 15 Nord Pas de Calais
- K.V.A 'B'
- K.V.A. B Dunquerque Freie Küste S/W
- K.V.A 'C'
- K.V.Gruppe Calais
- StP18 'Oldenburg', le Moulin Rouge
- Wn78 'Schwan' Blériot Plage sud des salines
- StP 'Fulda' Eisenbahn Batterie 710
- Wn92 'Maus', Blériot plage cemetiere
- Wn79 'Otter', Blériot plage,
- Wn102 'Berlin' Sangatte Ferme Baey
- StP123 'Mülheim' Calais Digue Royale ouest
- Wn103 'München' Sangatte le Cran
- StP106 'Dresden' M.A.A.244 Batterie MII Sangatte
- StP107 'Neuss' M.K.B. 'Lindemann' FCP
- StP125 M.K.B 'Prinz Heinrich' Ost
- Cemetary Les Baraques, CWGC, Sangatte, Calais.
- former German Cemetery at Sangatte
- K.V.Gruppe Wissant
- StP109 (Düsseldorf) Cap Blanc Nez Radar
- Wn111 'Wolfsschlucht', Cran d'Escalles
- Wn121 'Malervilla' Wissant le Typhonium Peilstand
- StP131 'Paderborn' 4./H.A.A.1143 Batterie St-Inglevert Aerodrome (French Air Force 1939, RAF 1939, Luftwaffe 1940's)
- StP139 'Hamm', Mont de Couple ouest, Artillerie Abteilung 105
- Wn140 'Osnabrük' Mont de Couple est Luftwaffe Station Radio
- Wn140a 'Godesberg', Flak Kommando, St Inglevert Wn141 'Magdeburg' A l´ouest de St Inglevert Calais Canadian CWGC Cemetery, Leubringhen
- K.V.Gruppe Gris Nez
- K.V.Gruppe Boulogne
- K.V.A. 'D1'
- Hardelot - Merlimont K.V.A. D1.
-
BEACH DEFENCE - - - - - - - - - -
- StP Danes Plage
- Wn03 Plage au sud, StP DannesStP 'Leine', Dannes plage
- FuMG 'Bulldogge', Ste-Cécile Radar
- StP Ste-Cecile H.K.B.
- StP 'Gabriel'
- StP 'Orakel'
- StP 'Atlantik' Touquet sud H.K.B. StP 'Alte' Bttr Stellung, Mayvillage. batterie Stp Stella Plage M.K.B.
- StP 'Strand 'sud, Stella et Merlimont
- StP 'Bunker', Merlimont Plage StP Merlimont Nord INLAND DEFENCE - - - - - - - - - -
- StP Mont St Frieux Complex StP 'Hasso', Dannes Sea Mines storage tunnels
- StP 'Ruine' Batterie 6./A.R.149. PART1.
- StP 'Ruine' Batterie 6./A.R.149. PART2.
- StP Beauregard Ferme StP Beauregard Stab Ren. Reg. 150
- Beauregard sud est
- 1./A.R.149 Camiers CWGC Etaples
- Etaples les Trembles H.K.B
- Stp Cucq 'Kinderheim' Batterie 8./A.R.149
- Merlimont Batterie
- K.V.A. 'D2'
- Berck - Le Crotoy K.V.A. D2.
- Wn 'Bunker' süd.
- StP Garde de Corps au nord Berk nord
- Stp Berck Nord
- StP Berck La Fourche H.K.B.
- Stp la Folie, Berck est.
- Berck Carrefour.
- Stp Berck Süd H.K.B.
- Stp Berck Süd radar
- Stp Schwartze Hand.
- Stp Colline Beaumont & StP Mont De La Motte.
- Stp Fort Mahon plage Stp Fort Mahon nord est
- StP Monchaux Quend Plage route principale
- Stp Quend Plage sud
- Stp Waben + Waben Kabelbrunnen
- Stp St Firmin Bihen H.K.B.
- AOK 15 Haute-Normandie
- K.V.A. 'E1'
- Stp Gruppe Cayeux
- Ca01 St-Valéry-sur-Somme.
- Ca02 Hourdel
- Ca039 Ferme de la Caroline, Hourdel
- Ca03 Brighton Phare Radar
- Ca04 Cayeux plage Nord
- Ca05 Centre Ville
- Ca06 Cayeux Plage Sud
- Cayeux Sud Batterie
- Ca07 Le Moulin de la Motte
- Ca08 Le Mont Roti
- Ca09 Lanchères.
- Ca010 "Skorpion" Vaudricourt Radar
- Ca011 Woignarue
- Ca012 Onival
- Ca013 Ault
- Ca014 Ault Sud
- Ca015 Ault H.K.B. Radar
- Boise de Cise
- Ca0test
- Stp Gruppe Le Treport
- Tre01, Mers les Bains ville et plage
- Tre03, Le Tréport, Ville et Port
- Tre04, Le Tréport falaise aval
- Tre05, Le Tréport Sémaphore Radar
- Tre06, Le Tréport 'Kahl-Berg'
- Tre07, Le Tréport, Mont Huon
- Tre09, Le Tréport, le Grange
- Tre011, St-Quintin la Motte Croix au Bailly
- Tre012, Plateau de la Croix au Bailly
- Tre016 Mers-les-Bains H.K.Batterie.
- CWGC Le Tréport Militery Cemetry.
- CWGC Communal Cemetery at Mers-les-Bains
- K.V.A. 'E2'
- Stp Gruppe Penly
- Stp Gruppe Dieppe
- Stp Gruppe Ste Marguerite
- Stp Gruppe St-Valéry en Caux
- K.V.A. 'F'
- K.V. Gruppe Fécamp
- K.V.Gruppe Etretat
- K.V. Gruppe Le Havre
- K.V.A. 'G'
- Stp.Gruppe Trouville
- Trou01 Berville sur Mer digue Rocher Godin
- Trou02 Honfleur digue est et port
- Trou03 Equemauville les Moulineaux
- Trou04 Honfleur plage
- Trou05 Vasouy
- Stp. Vasouy M.K.B.
- Trou06 Pennedepie
- Trou07 Criqueboeuf carrefour
- Trou08 Criqueboeuf plage
- Trou09 Fort de Criqueboeuf.
- Trou010 Villerville
- Trou012 Villerville les Hautes Bruyéres H.K.B.
- Trou013 Les Aubets Batterie 1./A.R.1711
- Trou014 Carrefour de la Croix Sonnet
- Trou017 Villerville Manoir du Grand Bec
- Trou022 Le Désert Laubeuf, Batterie 5./A.R.1711
- Trou23 Butte de Freville
- Trou024 Trouville-Villa Helisabeth
- Trou027 Trouville bourg
- Trou030 Trouville Pont de Trouville
- Stp.Gruppe Villers sur Mer
- Stp.Gruppe Cabourg
- AOK 7 Normandie
- K.V. Gruppe Riva-Bella (Sword/Juno Beach)
- AOK 7 / KVA H1
- Allied Counter Measures 5/6th June 1944
- Wn01 Merville Batterie
- StP02 Franceville Ost
- Wn03 Franceville-Plage
- Wn04 Franceville (no defences)
- Wn05 Franceville West
- Wn06 Sallenelles
- Wn07 Ouistreham Pointe du Siege (Sword Beach)
- StP08 Riva-Bella HKB "Bass" (Sword Beach)
- Wn09 Ouistreham Centre (Sword Beach)
- Wn10 Riva-Bella (Sword Beach)
- Wn11 Ouistreham-Le Maresquire (Sword Beach)
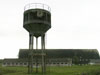
- Wn12 Ouistreham Cháteau d’eau "Daimler"
- Wn13 Pont sur le Canal ("Pegasus Bridge")
- Ranville CWGC Cemetery
- StP14 Ouistreham “Sole” (Sword Beach)
- Wn15 & 15a St-Aubin-d'Arquenay (Sword Beach)
- Wn16 Colleville-sur-Orne “Morris” ( Sword Beach)
- Wn17 Colleville-sur-Orne ('Hohe61')"Hillman” (Sward Beach)
- Wn18 Colleville Plage "Skate" (Sword Beach)
- Wn19 Colleville-sur-Orne (Nord) (Sword Beach)
- StP20 La Breche “Cod” (Sword Beach)
- StP21 Lion-sur-Mer “Trout” Sword Beach)
- Wn21a Périers-sur-le-Dan
- Wn22 (Hohe 18) La Délivrande - Wn23a Douvres-La-Délivrande (bourg)
- StP Douvres I “Distelfink” radar
- StP Douvres II “Distelfink” radar
- Wn23 Taileville, HQ Command Post (Juno Beach)
- Wn24 Luc-sur-Mer (Juno Beach)
- Wn26 Langrune-sur-Mer (Juno Beach)
- Wn27 Saint-Aubin-sur-Mer (Juno Beach)
- K.V.U. Gruppe Courseulles (Juno/Gold Beach)
- Wn28 Bernières-sur-Mer (Juno Beach)
- Wn28a Bény-sur-Mer (Juno Beach)
- Wn28b Bernieres-sur-Mer (Juno Beach)
- Wn29 Courseulles-sur-Mer (Juno Beach)
- Wn31 Courseulles (Juno Beach) Kabelschaltstelle Banville
- Wn32 La Marefontaine “Batterie Vera” (Gold Beach) Wn33 Ver-sur-Mer (Gold Beach)
- Wn33a Graye-sur-Mer (Gold Beach)
- Wn35 Ver-sur-Mer, le Marais (Gold Beach) Wn35a Mont Fleury Batterie (Gold Beach)
- Wn36 Asnelles - Roseau Plage (Gold Beach)
- K.V.U. Gruppe Bessin (Gold/Omaha Beach)
- AOK 7 / KVA H2
- Wn37 Asnelles (Gold Beach)
- Wn38 St-Cóme-de-Fresné, la Guerre (Gold Beach)
- Wn39 St-Côme (Gold Beach)
- Wn40, 40a, 40b & Pointe 54 le Puits d´Herod, Arromanches (Gold Beach)
- Wn41 Battr. Franziska, le Petit Fontaine Wn43/44 Arromanches
- Wn48 Longues-sur-Mer M.K.B. StP Port-en-Bessin Menu
- Wn59 Ste-Honorine-des-Pertes
- Wn60 Colleville-sur-Mer (Omaha Beach)
- Wn61 Colleville-sur-Mer les Moulins (Omaha Beach)
- Wn62 Colleville-sur Mer les Moulins (Omaha Beach) Sam Elliott pays tribute to SGT Ray Lambert
- Omaha Beach US Cemetery
- Wn63 Colleville-sur-Mer (Omaha Beach)
- K.V.U. Gruppe Percée
(Omaha Beach)
-
Wn64 St-Laurent-sur-Mer est (Omaha Beach)
- Wn65 St-Laurent Ruquet est (Omaha Beach)
- Wn66 St-Laurent-sur-Mer Ruquet ouest (Omaha Beach) Wn67 Les Moulins - Saint-Laurent-sur-Mer (Omaha Beach)
- Wn68 St-Laurent-sur-Mer les Moulins ouest (Omaha Beach) Wn69 St-Laurent-sur-Mer, (Omaha Beach)
- Wn70 Hamel-au-Prétre (Omaha Beach)
- Wn71 Vierville-sur Mer est Omaha Beach
- Wn72 Vierville-sur Mer le Casino (Omaha Beach)
- Wn73 Vierville-sur Mer ouest (Omaha Beach)Wn74 Le Bec et Baie du Mont (Omaha Beach)StP74a Le Guay, pointe de La Percée, (Omaha Beach) radar
- Steve Zaloga a 90 minutes talk and discussion about Omaha beach
- A1 Advanced Landing Ground
- Wn76 Moulin de Cricqueville
- Wn77 Le Point du Hable
- Wn78 Grandcamp-Maisy (est) Wn79 Grandcamp
- Wn81 Grandcamp-Maisy ouest
- Camps Training Areas and 'D' Camps prior to D-day in Southern England
- Camp D-3 Yellowham
- Camp D-4 Came Park Camp D-7 Dorchester Camp D-8 Down Wood
- Camps D-10, 11 & 12
- Woolacombe Assault Training T-13 Tolverne, Cornwall D-day Embarkation hard
- K.V.U. Gruppe Vire
- KVGr K.V. Gruppe Cotentin Ost
- AOK 7 / KVA J1
- K.V.U.Gr Marcouf (Utah Beach) Three day Tour of Utah and Cherbourg east area.
- Wn01 Le Grand Vey
- Wn02-02a Houesville
- Wn2 Poupeville (Utah Beach) Wn03 Le Beau Guillot (Utah Beach)
- Wn05 La Madeleine Plage (Utah Beach)
- Wn08 Auderville la Hubert la Redoute (Utah Beach)
- StP09 St Martin de Varreville (Utah Beach)
- Wn10 Hameau Mottet
- Wn11 Foucarville Mauger
- StP12 Ravenoville St-Hubert
- Wn13 Grand Hameau des Dunes
- Wn14 Le Fort Redout de Ravenoville
- Wn14a Hameau du Sud - Les Gougins
- StP16 Hameau du Nord - Fort Pongubaud
- Wn17 Hameau de Fontenay - La Brèche
- 101st Airborne Aldbourne, Wiltshire to Carentan, France
- StP108 St Martine de Varreville H.K.B
- StP133 Batterie 'Azeville' HKB
- StP135 St-Marcouf M.K.B.
- K.V.U.Gr St Vaast
- Wn18 Quineville le Bours Neuf le Havre
- Wn19 Quineville Fort Lestre Hameau Simon
- Wn20 Quineville Bourg The Capture of QuinevilleWn137 Quineville le poteau Ginsteröhe
- La Maison Rouge
- La Maison Rouge Nord
- Wn22 Quinéville Mt Coquerel H.K.B.
- Wn23 Aumerville Lestre Plage
- Wn25 Morsalines La Redoute
- Wn28 Quettehou ville + Art. batterie.Wn140 Morsalines Le Hutrel
- Les Arquets Lighthouse FCP for Bat Crasville
- StP142 Crasville Videcosville H.K.B.
- K.V.U.Gr St Barfleur
- Wn113 Rive droite embouchure de la Saire Wn114 Rive gauche embouchure de la Saire
- Wn115 Pointe de Saire
- Wn116 Les Epagnes Dranguet
- Wn118 Pointe de la Loge
- Wn119 Pointe de Landemer La Houe
- Wn120 Le Moulard
- StP121 Barfleur le Cracko
- StP122 Barfleur rive gauche du port Wn123 Le Havre de CrabecWn124 Phare de Gatteville
- StP152 Batterie Gatteville Havre de Roubary, Gatteville, Point de Barfleur.
- Wn125 Le Coin du Rôle Anse de Gattemare est Gatteville Chemins des Vastines R612 Casemate
- Wn126 Pointe de Neville M.K.B. 'Blankenese' 2009 & earlier
- Wn126 Pointe de Neville M.K.B. 'Blankenese' 2011
- Le fortin de la guerre des Sept ans Réthoville Plage
- Wn127 Réthoville Plage
- Wn128 La Heuge
- Wn129 Plage du Vicq
- Wn129a Pointe de la Loge
- Wn130 Fort Joret
- Wn131 Pointe de Fréval
- INLAND -------------------------------------
- Wn144 La Pernelle ObservatoirsWn144 La Pernelle Observatoirs being up dated
- Wn162 La Parnelle ´Luftwaffe´ station
- Wn165 Cosqueville étang du Palat Wn165 Mont Etolan
- AOK 7 / KVA J1
- K.V.U. Gruppe Cherbourg See
- The Battle of Cherbourg
Mark Felton
ProductionsBatterie de Fermanville le Judee
'Ostmark' - StP201 Cap Lévi 'Seeadler' MENU Radar
- WN202 Le Perrey
- Batterie Brule (f) MENU page WN203 Point du Brick MENU pageWN233 Tot de haut - Leitstand for StP234 Bat. Hamburg
- StP234 M.K.B. 'Hamburg' MENU page
- Wn241 Le Fort de Digosville (Fort des Roches)
- StP235 Carneville 'Osteck' Luftwaffe Station
'Tousendfüssier' MENU radar - StP245 Fort des Caplains M.K.B.'Brommy'
- WN205 Fort du Hou ou de Bretteville bas Batterie DigosvilleWn243 La Lande St Gabriel
- Wn208 Plage Collignon
- StP209 Port Flamands
- Wn248 Château de Tourlaville,
Stab Marine-Artillerie-Abteilung 260 Wn221a (Stp221) Defence ouest du
terrain de Querqueville - Wn224 Fort de Nacqueville bas
- Wn225 Fort de Nacqueville bas
Luftwaffestation 'Caster' Wn226 Nacqueville Les Quais - StP255 Fort Du Roule M.K.B. MENU page
- StP271 Redoute des Couplets
- StP272 Batterie Les Couplets
- Rue d' Ozouville-Tonneville les
Maresquiers BatterieStP277 M.K.B. York Amfréville et fort
annexe MENU page - Batterie Ouest D'Amfreville (f) Wn227 Le Dur EcBatterie Française Tourville (Souterrain) Castel Vendon M.K.B. 'Landemer'
- Hôpital Pasteur R118 Sanitatbunker
- The Battle of Cherbourg
Mark Felton
- K.V.U. Cherbourg Land
- K.V.U. Gruppe Joburg
- AOK 7 / KVA J2 Wn301 Pointe de la Cormorandière Eculleville.
- Wn302 Fort d´Ormonville
- Wn304/Wn304a Pnt de Jardeheu [Wn392 Coast Guard]
- Wn305 Plage du Hameau Benet
- Wn306 Pointe du Nez
- Wn307 Fort des Rochers du Var ou Fort St Martin Wn308 Sémaphore la HagueWn310 La Roche Gros MontWn311 Ecalgrain plage
- Wn314 la Crecque
- Wn315 Vauville le Fort
- Wn317 Biville Nord
- STP318 Héauville plage Wn345 Digulleville 1./Art. Reg. 1709Wn346 Les Asselins la Gouinerie, Radar
- Wn347 Hameau de Bas, Peilstand/SK (E.Batt 685).
- Wn349 Auderville la Roche Luftwaffe Station "Ammer" radar
- StP351 Auderville la Roche H.K.B. 1./1262 "Stahl"
- Wn354 Casernments d'Auderville Laye
- StP356 Auderville Laye H.K.B. (E Batt 685)
- StP356 Auderville Laye H.K.B. “Flak”
- Wn357Souterrain de Laye Wn387 Beaumont Hague sud Cemetière Stab 1./H.K.A.R.1262
- StP391 Biville le Petit Thot H.K.B.
- Sqn Leader P.E Drew
- K.V.U. Gruppe Cotentin West
- K.V. Gruppe Riva-Bella (Sword/Juno Beach)
- AOK 7 Les Iles Anglo-Normandes
- Alderney
- M2 Wn Hafen
- M3 StP Josephsburgh
- M5 Wn Hafen-Süd
- M4 Wn Dohlenfest
- Panzermauer 12, Platte Saline
- W 1 StP Türkemburg 'Cambridge Battery'
- W 1 StP Türkenburg, Victorian Magazine
- MP5 Türkenburg Flak
- W 2 Wn Müllerhof
- W 3 Wn Steinfeste
- W 200 FlakStP. Felsenbucht
- W 202 FlakStP. Peil
- MB 2 M.K.B. Batt. Annes
- Wn Eilandfeste, Fort Raz
- M.B. Elsaß, Fort Albert
-
Wn ‘Piratenschloss’
- Guernsey
- Batterie Mirus
- Underground Hospital & Ammunition Store
- Batterie Dollmann
- Marine Peilstand 4
- AOK 7 Brittany
- KVGr Rance
- AOK 7 / KVA A1
- KVU Gr Cancale
- Ra104b/Ra310a Pointe du Grouin.
- Ra106 Ile Du Guesclin.
- Ra107 Pointe du Meinga.
- KVU Gr Festung St-Malo
- Ra109 Pointe de la Varde
- Ra116 Fort du Petit Be
- Ra144 Le Tertre aux scenes.
- Ra143 Plage de Longchamp est
- Ra145 Garde Guerin StP 'Paulus'
- Ra145 to 145a Dinard Golf
- Ra145a Le Port Hue
- Ra146 Garde Guerin Sud
- Ra149 Plage du Perron
- Ra150 Le Nessay
- Ra155 Ville es Mesneirs, 'Battr. Kahlenbach'.
- Ra156 la Richardais H.K.B.1271
- Ra157 la Broussette 6./A.R.177
- Ra230 Fort De La Cité D'Aleth outer defence.
- Ra230 Fort De La Cité D'Aleth inner defence
- Ra236 I. Pleurtuit
- Ra237 Cognees, le. Flak.Abt.912.
- Ra276 Grand Bé Batterie 2./M.A.A.608.
- Ra277 Cezembre Batterie 1./M.A.A.608.
- Ra603 St Ideuc
- AOK 7 / KVA A1
- KVGr Lamballe
- KVGr Morlaix
- KVGr Saint Renan
- AOK 7 / KVA B
- StP Kermorvan, Re104 to Re119StP Kerlohic, Pointe des Renards
- Re137 Pointe St Mathieu radar
- Re305 Batterie MKB 'Von Holtzendorf', AA Batt. 'Arnika'.
- Re305 Batterie MKB 'Von Holtzendorf' FCP.'
- Re305 Batterie MKB 'Von Holtzendorf'
- Re302 Batterie 'Graf Spee' FCP
- Re303 Batterie 'Graf Spee' M.A.A.
- KVGr Carmaret
- KVGr Lorient
- AOK 7 / KVA C1
- Wn Lo24 Le Loc'h, Guidel Plage
- Wn Lo25 Le Locmiquel, Cote 40
- Wn Lo26 Plage de Fort Bloque
- Wn Lo28 Pointe de Fort Bloque
- Wn Lo32 Le Couregant
- Wn Lo78 Milieu de l'isthme de Gavres
- Wn Lo90 Kermorin, Plouhinec 6./A.R.265
- StP Gavres Lo112 Ban-Gâvres
- StP Gavres Lo362 Fort de Port Puce
- StP Gavres Lo335 M.A.A.
- StP Gavres Lo361 Flak Batterie 'Melsung'
- KVGr Vannes
- KVGr Loire
- KVGr La Baule
- Wn Tu22 Le Mont Lénigo
- Wn Tu23 St-Goustan
- Between Tu23 & Tu24 Defended wall
- Wn Tu24 Fort Hikeric Wn Tu25 Le Croisic Port Lin
- Wn Tu27 Pointe Penchat
- Wn Tu39a Pornchet ave. Collet & ave. de Lucie
- Wn Tu40 Pornichet Mazy German Cemetery 1939-45, Pornichet, Saint-Nazaire.
- Wn Tu41 Pointe du Bec
- Wn Tu301 La Dilanne M.K.B. 'Kermoisan'
- Wn Tu500 Croisic Vigie de la Romaine: Luftwaffe station 'Nutria'
- K.V.U. Gruppe St-Nazaire
- Wn Nz104 avant port rive ouest
- Wn Nz105 avant port rive est
- Wn Nz107 BSM U Schleuset
- Wn Nz351 La Vacuerie
- Wn Nz355 Camp de la Torpille
- Wn Nz364 Le Petit Marsac
- Wn Nz365 Le Grand-Marsac
- Wn Nz401 carrefour Sautron collége
St-Louis - Nz406 BSM U Bunker
- KVGr Rance
- AOK 1 Vendée - Charente Maritime
- AOK 1 / KVA D
- KVVr Süd Ile Noirmoutier
- KVGr Süd Île de Ré
- KVGr Süd La Rochelle/La Palice AOK 1 / KVA E1
- Gironde Nord
- Gironde Süd
- Cockleshell Heroes Memorial
- Gi301 Pointe de Grave 'Koblenz' H.K.B.
- Gi307 Les Arros 'Reichenberg' M.K.B. MENU PAGE
- Gi308a Soulac Nord 'Darmstadt'
- Gi309 Soulac sud Casino 'Saarbrucken'
- Gi310L Soulac sud 'Sagan'
- Gi321 Soulac Fosse Antichar est du Chateaux Neryan
- Gi325 Chenel de Neryan 'Traknen'
- Gi326 Moutardier 'Insterburg'
- Gi331 Le Verdon 'Lauban' E. Battr
AOK 1 / KVA E2
- KVGruppe Bordeaux
- V1/V2 Sites Manche area
- Ligne Maginot
- Führerhauptquartier ‘Wolfsschlucht 2’
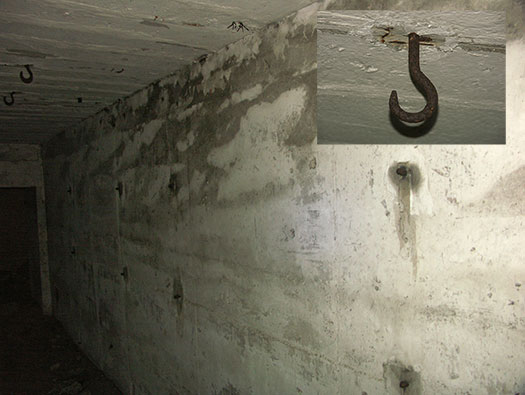
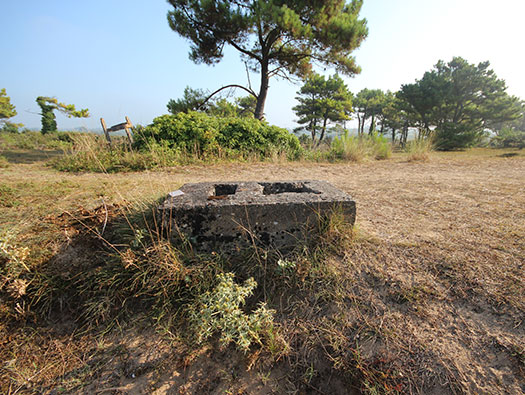
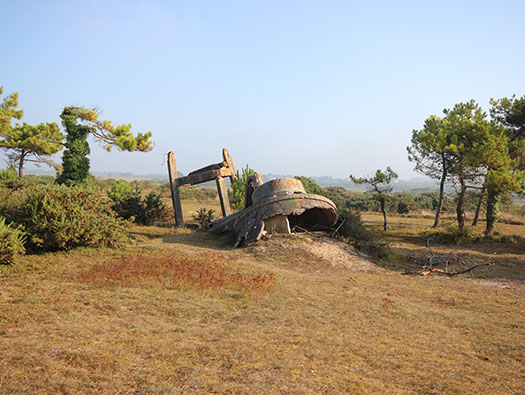
- Bunker Details MKB Bunkertour
 Great Britain
- Scotland
- ROSS and CROMARTYLoch Ewe & its Defences MENURAF TainANGUSRAF Stracathro FIFESHIRERAF/RNAS Dunino (HMS Jackdaw II) EAST LOTHIANRAF Drem/RFC Gullane, MENURAF/RNAS East Fortune, MENURAF Macmerry, MENU
- Yorkshire
- Nottinghamshire
- Warwickshire
- Worcestershire
- Hertfordshire
- Wales
- Northamptonshire
- Buckinghamshire
- Oxfordshire
- Berkshire
- Gloucestershire
- Surrey & Kent
- Battle of Britain
- RAF Biggin Hill
- RAF Kenley
- RAF Redhill
- Wiltshire
- RAF Blakehill Farm Aldbourne 101st Airborne Easy Company
- RAF Wroughton MENU RAF Hullavington RAF Colerne
- RAF Long Newton MENU
- RAF Clyffe Pypard
- RAF Ramsbury
- RFC/Bristol Aeroplane Co./RAF Yatesbury MENU RAF Melksham
- Overton Heath RLG
- Manningford RLG
- Alton Barnes RLG
- RAF Keevil MENU - completely updated Stirling Squadron 'Night Flight' over Europe (1944)
- RAF New Zealand Farm MENU
- Everleigh RLG/SLG RFC/RAF/Army Upavon MENURAF Netheravon MENU
- RAF Shrewton RLG
- RAF Rollestone Camp
- Oatlands Hill RLG
- RAF Boscombe Down MENU
- High Post Spitfire Assembly
- RAF Old Sarum MENU
- RAF Dinton - Chilmark Ord. Depots
- Oakley Farm RAF Ord. Depot
- RAF Zeals
- Somerset
- Hampshire
- RFC Andover MENU
- RAF Thruxton
- RAF Lasham
- RAF Middle Wallop
- RAF Chilbolton
- Chattis Hill, Spitfire production
- RAF/RNAS Worthy Down MENU
- RAF Ibsley MENU
- RAF Hurn (Hampshire) was Dorset
- RAF Stoney Cross MENU
- RAF Holmsley South MENU
- RAF/RNAS Gosport RAF Beaulieu
- Lymington ALG
- Needs Oar Point ALG
- RAF Calshot
- Sussex
- Dorset
- Airfields
- RAF Tarrant Rushton MENU
- Stirling Squadron 'Night Flight' over Europe (1944)
- RAF Hurn (Hampshire)RAF Warmwell MENU
- Moreton Admiralty Airship Station
- Emergancy Coastal Defence Batteries.
- Swanage ECD Battery, Dorset.West Bay ECD Battery, Dorset.
- Stop Lines & defences
- The Defence of White Mill Bridge Sturminster Marshall, Dorset.
- Wareham to Dorchester, Dorset Old Site
- Dorchester to Maiden Newton, Dorset Old Site
- Kimmeridge Bay Defence's, Dorset Old Site
- D Camps prior to D-day in Dorset
- .
- Camp D-3 Yellowham
- Camp D-4 Came House
- Camp D-7 Dorchester Camp D-8 Down Wood
- Camps D-10, 11 & 12
- Auxiliary Unit Hides, DorsetBushes Farm Auxiliary Unit Hide, DorsetSpetisbury Auxiliary Unit Hide, DorsetCreech Barrow Auxiliary Unit Hide, Dorset Old Site
- Came Park Auxiliary Unit Hide, Dorset Old Site
- Fuel Storage
- Portland Underground Fuel Depot, Portland, Dorset.
- Radar Sites
- RAF Verne Radar, Dorset Old Site
- RAF Ringstead Bay Radar Site, Dorset
- Camps
- Piddlehinton Camp, Dorset Old Site
- RAF Ringstead Bay Upton Camp, Dorset Old Site
- Search Light Sites N18 Searchlight Site, Winterborne Kingston, Dorset
- Wreck Recovery
- Spitfire Wreck Recover Old Site
- Devon
- Cornwall
- Defence of Britain
- Emergancy Coastal Defence Batteries.
- Swanage ECD Battery, Dorset.
- Stop Lines
- Wareham to Dorchester, Dorset
- Dorchester to Maiden Newton, Dorset
- Defence of Blandford Forum, Dorset
- Kimmeridge Bay Defence's, Dorset
- Hinton Admiral Pill Box, Hampshire
- Search Light Sites
- Winterborne Kingston N18 Searchlight Site
- AA Gun Sites
- Arne HAA Gun Site Dorset
- AA Towers at Holton Heath Dorset
- Portishead B2/1 HAA Gun Site, Bristol
- Portishead B-/2 HAA Gun Site, Bristol
- Maker HAA Gun Site Plymouth
- Camps
- Piddlehinton Camp, Dorset
- RAF Ringstead Bay Upton Camp, Dorset
- Radar Sites
- RAF Verne Radar
- RAF Ringstead Bay Radar Site, Dorset
- Chain Home No.18 RAF Trerew Radar Site, Cornwall
- Auxiliary Unit Hides
- Creech Barrow Auxiliary Unit Hide, Dorset
- Came Park Auxiliary Unit Hide, Dorset
- Bushes Farm Auxiliary Unit Hide, Dorset
- Spetisbury Auxiliary Unit Hide, Dorset
- Other Military sites in England
- Fuel Storage
- Plymouth Fuel Storage depot for D-day
- Portishead Fuel Storage depot
- Portland Underground Fuel Depot
- D Camps prior to D-day and Embarcation Hard's
- Aldbourne & Easy Company
- Camp D-3 Yellowham
- Camp D-4 Came House
- Camp D-7 Dorchester Camp D-8 Down Wood
- Camps D-10, 11 & 12
- T-13 Tolverne Embarcation hard Woolacombe Assault Training
- Buildings
- The Nissen Hut
- Miscellaneous
- British Atlantic Wall
- Antiaircraft Towers Holton Heath
- Middlebere Air Raid Shelter
- Hospitals
- Kingston Lacy D-day 106th US General Hospital
- Bombing Ranges
- Ashley Walk Bombing Range
- Brean Down Bombing Range
- Miscellaneous